Dear Reader,
With this month being devoted to my new Uruk Tracker force, I took the opportunity on Sunday night to get together with Donatello to playtest my boys. Per an insane last week of work, it has unfortunately taken over five days to get this post up, and for that I apologize to our loyal viewership. My hope was to get it up on Monday, but life has a way of thwarting seemingly simple plans like posting on a blog, :P
But I digress. :) As we talked about which force he'd like to use, I mentioned in passing a Gondor force that I had been dabbling with, and it caught his eye. So in this battle report, I'll be using my Rager's Raiders list, and Don will be testing my new Defenders of Osgiliath list. You can find the breakdown for each team below:
Rager's Raiders (Isengard Raiders, LOME)
-Ugluk (60) (Army Leader)
-Vrasku (60)
-Uruk-Hai Scout Captain w/ 2Her (55)
-Uruk-Hai Scout Captain (50)
-6 Feral Uruk-Hai (72)
-1 Uruk-Hai Scout w/ banner (33)
-20 Uruk-Hai Scouts w/ shields (180)
-10 Uruk-Hai Scouts w/ bows (90)
TOTAL: 600 pts, 41 units, 10 Might
Defenders of Osgiliath (Rangers of Ithilien + Fellowship + Grey Company, LOME)
-Faramir w/ hvy armor/shield (80) (Army Leader)
-Damrod (20)
-8 Osgiliath Veterans w/ shields (72)
-8 Osgiliath Veterans w/ bows (72)
-8 Osgiliath Veterans w/ spears/shields (80)
-Boromir of Gondor (105)
-3 Rangers of the North (75) (Culang, Cadan, Torchirion)
-3 Rangers of Arnor w/ spears (27)
-9 Rangers of Arnor (72)
TOTAL: 603 pts, 42 units, 13 Might, 24 bows
A bit of discussion about this new list before I delve into the battle report (since this list has never been used or tested here on the TMAT blog). First of all, this list combines two of my favorite forces in the game: Osgiliath Veterans and Grey Company. Osgiliath is my favorite battle in all of Middle Earth lore bar none (which is amazing, since my favorite character is Eomer), and being able to use Os Vets in my Osgiliath Ruins scenery is something I've wanted to do for a while. I thought of using Rangers of Gondor instead of teaming in Grey Company, but as this would make my Os Vet archers obsolete (as they'd still need to fit the 33% bow limit), I opted to team in Grey Company without a power hero to attempt to stay thematically pure while still building the strongest list I can.
Second, though, the list is a highly durable one. With both Faramir and Boromir, my Os Vets have a wide radius in which they become F4 D6 warriors with Courage 4 - which is very handy for engaging terror-causing units, even if a Nazgul is present. Behind the solid line of spear-supported F4 D6, though, you also have 24 bows (25 if you choose to give Faramir one instead of giving him a shield), which is enough for two (read it again: two) volley lines. This force can carve holes in enemy formations from a distance solely because of overwhelming amounts of archery. When placed within a city where a model usually has to choose between cover from enemy archery and being able to charge next turn, this really plays to your advantage.
Finally, you have 6 heroes: Boromir (your melee tank), Faramir (who can either do ranged damage with solid melee offensive stats or be a secondary melee tank), 3 Rangers of the North (for a good spread of S4 firepower and a Might or Will point here or there), and Damrod (who is a Ranger of the North with -1 armor and -1 Courage for 5 points less). Personally, I really like the last four heroes more than the first two, which is good since people tend to target the Sons of Gondor first. :P
This is the list I'm thinking of taking to the Hunters Red October Tournament, but I'm still deciding (there's a side of me that is making a very strong argument for a straight Grey Company list, so we'll see). Needless to say, as I'm giving Donatello the defensive position in our scenario today, this will be a hard team for me to crack as I test out a new civ.
Today we will be playing a To the Death scenario, with the following scoring rules:
Per Don's last To the Death match, he was much more optimistic of his chances to win in this battle, and had a subtle hungering for revenge ("You won't have a mounted macho hero this time to tear up my ranks, Glenstorm," :) ). I was more than happy to accommodate, as Don (along with most of the LOTR SBG gaming community, I'd contend) underestimate the power of a well-placed Ugluk on an enemy line. Our battle takes place today on the outskirts of the ruined town of Osgiliath. During a brief hiatus from their skirmishes with the forces of the Dark Lord, scouts report a horde of uruk-hai thundering toward the rear of their position. Without barricades or the river to protect them, the forces of Good rally their defenders to defend the aged city.
Glenstorm's Strategy: Donatello's archery is going to pummel me as I approach. With almost 25 bows, he's expected to do about 2 casualties a round from range, which means I'll likely be short 4-6 guys before entering melee combat. Since he also has superior numbers (by 7 worst case scenario with the stats above factored in), I'm going to attempt a 1-2 punch using melee and archery. My archers will primarily screen the rest of the army, attracting volley fire and straight shots once within range, with Vrasku doing a few kills at range before closing in for melee combat. My shields will screen the captains, who I will attempt to use to kill rangers, as they wound on 4s (or 3s for the 2H). Ugluk will hold down Boromir and force him to burn through Might quickly. To win the match, I'll break his army, not lose my banner, not lose Ugluk, and quickly fall to 25% to end the match.
Donatello's Strategy: Glenstorm's shields and captains are all D5, which means wounding them with archery will be hard. Most of my army will be F4, though, so the Uruk advantage of high FV will be lost so long as I keep Boromir and Faramir alive. That means I'm going to attempt to keep both of them out of combat with his heroes as much as possible, as those Might points could cause additional losses on my forces due to a loss of FV. The goal will be to draw his elements toward my more defensive positions, keep him from wrapping around my men, and use spear support to force him to shield. Killing the ferals will take priority, followed by the banner for Victory Points. So, to call the ball: Boromir and Faramir will break the two flanks, the rangers will provide supporting fire on the wings in a Flying Column formation, and I'll shelter the center with suppressing fire to keep his elements from reinforcing each other.
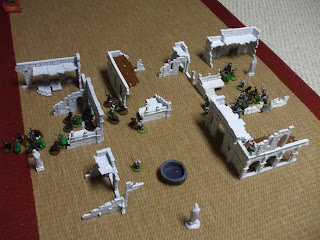
The board was set, our forces were placed, and as we prepared for Round 1, the board looked like this:

And with that... ("For death and glory!")
Round 1 (P: Osgiliath)
The armies advanced toward each other, with the rangers at the top of board opting to move 3" to form a volley line. As you'll notice, Don has his Os Vet archers split up between Boromir and Faramir's detachments, so he is only sporting one volley line (that is also attempting to hold against my right flankers). I opted to move my uruk archers 6" this round, as my chances of scoring a kill were very low, and I was more interested in getting into the city than sitting outside like deer in a glen.

In the Shoot Phase, Torchirion killed one of my archers and one of the rangers of arnor took down one of my uruk shields with their volley line. With no melee attacks in the Fight Phase, we move to Round 2.
Round 2 (P: Osgiliath)
Forgot to take a board shot - my fault. Don moved up his force, taking entrenched positions behind barriers and walls as his archers moved up to the higher sections of the ruins. My force approached the city, and began the long process of entering the maze of walls that was the edge of town. Vrasku opted to stand his ground and load this turn.

In the Shoot Phase, Culang and one of the Rangers of Arnor took out two of my uruk archers before they could fire.

On the far side, one of the Rangers of Arnor took down one of my uruk shields.

In response, Vrasku shared the love that was going around and took down an Os Vet and Os Vet with spear from Faramir's detachment (1/3M). With my force moving through the firing lane that Vrasku is currently using, though, I will likely need to move him next turn to get him in a better firing position. With no melee fights, we move to Round 3, where I finally manage to get priority!
Round 3 (P: Isengard)

The armies are now firmly within the city, and the men of Gondor are eyeing close combat (which looks like it will be met in Round 4). The Osgiliath Veteran archers have primarily taken higher positions, and the brave company of rangers on the far left are now being supported by Boromir and his force on the other side of the wall. Ugluk and his detachment head toward the mighty son of Gondor, while the captains take their forces around the wings.
Glenstorm's strategy: My plan over the next few turns is to move Vrasku toward the center of the map, so that I can use him to fire down the spear support lines. This will either draw soldiers away from their intended detachments, or it will negate the spear support advantage that Don has on me. Optimally, a number of the rangers will be in the crosshairs, as I wound them on 4s instead of 5s.

Pardon the blur. In the Shoot Phase, my archers killed no one (my token dice wiff round), and Don responds with yet more wounds from archery. Cadan killed one of the uruk shields (1/1M), and then...

...One of Culang's rangers killed another uruk shield, and the Osgiliath Veteran archer with the head bandange also managed to kill my archer that made it to the perch on the city wall, bringing the casualty count so far to...
Casualties: 8/41 against the Uruks, 2/42 against Osgiliath ("This...isn't going very well...")
Round 4 (P: Isengard)

MELEE TIME!!! After three agonizing rounds of casualties, my force is finally in its element: the inevitable mauling and goring of close-combat melee rounds. Ugluk and his force (with banner support) are locked against Boromir's force of F4 Os Vets, and the captains have engaged the front lines on the wings. As Vrasku stops to load, most of the uruk archers opt to move 6" in order to bring them into melee combat next round.

In the Shoot Phase, Vrasku takes down both of the archers in his firing lane (2/3M), but both of my uruk archers on the right failed to hit the Os Vet archers up top. In response, Donatello's already deadly archery take the casualties to the next level. Damrod took a well-aimed shot at the Feral Uruk-Hai coming around the far right side ("Man, I wanted that!"), and the Os Vet archer with the head bandage took down one of my uruk archers ("Dude, this guy's a BOSS!"). On the other side of the board, just to add insult to injury...

The Ranger of Arnor at the top of the steps (far right of the pic) took down another of my Feral Uruk-Hai, paying for himself and then some in one round of archery. (*Blink blink* "...Words fail me...") And on that note, as the lines crashed together, a slew of Heroic Combats were called as we entered the Fight Phase.
In the Fight Phase, there were 4 Heroic Combats called, resolved in the following order: Boromir (1/6M), Ugluk (1/3M), Culang (1/1M), and Faramir (1/3M).

Boromir wins his fight and kills his uruk (3/6M), then engages another uruk shield. Ugluk, in response, kills his Os Vet Swordsman, and engages the spearman that was previously spear supporting Boromir.

In Culang's combat, he, Dannassel, and the other ranger killed the trapped uruk, and they split forces to support his men. He and Dannassel tagged the uruk shield in the Feral Uruk-hai's fight, while the other ranger assisted in the fight with the Uruk Scout 2H Captain. Faramir lost his Heroic Combat (I could have won it if I spent my remaining 2 Might points, but I decided not to. In hindsight, this was a very good call) to the shielding uruk, which ended all of the Heroic Combats for this turn.

Sorry again for the blur. In the rest of the Fight Phase, the Os Vet with spear support to the right of Ugluk killed the Feral Uruk-Hai they were up against, which set back my plans a lot. Boromir won his fight, but failed to wound the uruk shield (I could have wounded him if I spent 2 more Might, but I again opted not to. I'm also glad in hindsight that I did that). Ugluk killed his man handily, and the other Feral won his fight but failed to wound the Os Vet.

On the far left side of the battle, nothing goes right for the rangers. An uruk shield kills one of the Rangers of Arnor, the Uruk Scout Captain kills one of his rangers (2/2M), and the Feral Uruk-Hai wounds Torchirion once who fails to save the wound with Fate (1/1F), and is unable to promote the Fate roll with his Might to a winning number ("That bites.") ("Yeah; I'm sorry, man..."). The uruks now outnumber the rangers on this side, which from my experience as a Grey Company player does not bode well for their survivability.

On the right side of the field, things are looking much better for Don. One of the Os Vets kills one of my uruk shields, while the Uruk 2H Captain goes to town on the rangers in his combat, wounding one of the rangers and barely missing the other. Don still has me majorly oustripped on numbers on this side of the board, though, which will cause problems for my force.
Casualty Count: 15/41 against Isengard (6 from break), 10/42 against Osgiliath (11 to break)
Round 5 (P: Osgiliath)

As we enter Round 5, the armies are now completely engulfed in melee combat. I called a Heroic Move with my Uruk 2H Captain, as I wanted to reform the lines a bit, as we were very scattered at the end of the last turn. Don didn't challenge it (My heroes and warriors were in well-entrenched positions, so I wasn't very worried about my position afterwards. I'm also hoping to save Faramir's Might for later this round), so the movements ended like this. After Don engaged my archer at the top of the board, I opted to move Vrasku into melee mode, taking advantage of his F5 S5 in close combat. My uruks swarm his rangers on the far left - I'm really looking forward to seeing how he's going to call those combats, :) With no shots available in the Shoot Phase, we move directly into combats.
Four Heroic Combats are called, and were resolved in this order: Boromir (4/6M), Ugluk (2/3M), Faramir (2/3M), and Vrasku (3/3M). Boromir succeeds in killing his man (5/6M) ("AAAARRRRGGGGHHHH!!! These SHIELDS!!!"), and engages the banner (which is potentially a problem for me, as it is an easy 2 points for me if my banner survives, and is my primary means of attempting to win this game at this point). Ugluk and the shield involved in his combat kill their man, and they both engage Boromir, hoping to protect my banner, and take advantage of the fact that he is down to only 1 Might point.

On the other side, Faramir kills the uruk shield in his fight (3/3M) ("Man, the shields are killing my Might store today!"), and then engages the uruk archer in the Feral Uruk-Hai's combat, evening the odds in the Os Vet fight.

Vrasku and the archer kill their man, and they split forces. The archer moves to reinforce Ugluk and his troop, while Vrasku attempts to join up with the Uruk 2H Cap on Faramir's side of the board.

Don opted to start with the fights on the left first, and he met with great success. The Feral took down one of the Os Vet Swordsmen and one of the rangers fell to my 2Her Captain, but all of the other fights went his way. Faramir and Damrod killed their men, Captain Terrek and his spear support felled another warrior, and the ranger at the top of the screen somehow fended off yet another wave of aggression from the two uruk archers at the top of the screen. Culang and Dannassel lost to the shielding uruk in their combat, but Don is still managing to outscore me in kills on this side of the board. He also has me 1 model away from breaking, which is not good considering that Boromir has yet to go...

...And he gets that kill. Ugluk passed the Horn of Gondor courage test (Test: 11), but we failed to win the fight, and he managed to kill both the banner and the shield (6/6M), which breaks my army and costs me my banner. The other units in this area all did a bunch of nothing: I think the highest number any of us rolled was a 2 in those fights. It was...pretty pathetic, which is not good since I'm still pretty far from breaking him, which I need to do very soon.

On the far left, the dramatically overwhelmed rangers managed to hold on valiantly, with only two rangers falling in close combat. My plan at this point is to overwhelm the aged retainer, Cadan, and the spearman, and start rushing warriors through the door to assist with the Boromir problem.
Casualty Count: 22/41 against Isengard (9 from game), 16/42 against Osgiliath (5 to break)
Round 6 (P: Isengard)
Before discussing this round, I wanted you to know that there was a lot of nothing this round; the dice hated both of us, so there was not nearly as much carnage as there could have been (which I was okay with for this round). I started out by courage testing for my army, and with all of my heroes passing (Uruk Cap: 14, Ugluk: 11, Vrasku: 13, Uruk 2H Cap: 12), and one uruk archer passing (Test: 10), everyone stuck around to continue the assault. Don started moving a number of his archers off of the perches and brought them into melee range. With no shots available, we moved into combats.

On the far left side, I was counting on five kills (which would break his army), and only managed to kill Cadan. One of the Os Vet Spearmen managed to kill one of my archers, and the rest of the fights in the area were wiffed on both sides. The Feral passed Boromir's Horn of Gondor test (Test: 11 - yay for C5 units!), and after winning the fight, Boromir wounded Ugluk once, who wiffed his Fate roll (1/2H).

On the left side, Captain Terrek manages to kill one of the Uruk shields, Vrasku kills one of the Os Vets, and the uruk archer with the helmet manages to kill Damrod (who wiffed his Fate roll; I'm still a bit ticked about that) instead of aiming at Dannassel. At the end of the round, the casualty count is coming down to the wire:
Casualty Count: 24/41 against Isengard (7 from game), 19/42 against Osgiliath (2 from break)
Round 7 (P: Osgiliath)

Don began his move by tagging all of my captains, which prevented me from calling "Stand Fast!" on successful courage tests this round for my captains. I ended up testing for 5 units, and two of them ran (which you can see exiting on the far left side of the pic). From this angle it's impossible to see, but Vrasku has been trapped and swarmed by Os Vet archers, and my men are pretty much ganged all across the board except on the far left. Things are looking desperate for me as I'm 7 casualties from the end of the game and have still not managed to break his force. With no shots available, we move to fights with no Might points left on the board.

Faramir manages to kill the Uruk 2Her, and the Os Vet archers land 2 wounds on Vrasku, who fails his Fate roll (1/1F, 2/2H). The Feral wins his fight against Culang and Dannassel, though, and wounds Dannassel.
And here it is worth taking a moment to pause for a moment for the gravity of the situation - and by this I do not mean that Don is 1 unit away from breaking. I am referring instead to two solemn facts that have both come to a head in this fight. First, this is the first time Dannassel has been a casualty in combat, which on its own deserves a moment of silence. What is more, this is also the last time I will be fielding Dannassel, Ranger of Arnor, in my army, and thus her first death is also in her last game, which is worth pausing over.
...LET ME EXPLAIN!!! :) The reason that this is the last combat for Dannassel, Ranger of Arnor, is not that I am not fielding the model in combat anymore. After all, after all of the time I spent on the conversion, I could never bring myself to not field the model in a fight. Instead, I wanted to take this moment to announce that Dannassel will be undergoing yet another conversion: in the next battle report you read involving her, you will be introduced to her as Dannassel, Ranger of the North! Of all of my Rangers of Arnor, she has well earned a place among the greatest of her kin, and I look forward to changing the paint scheme to accommodate her as a stronger, more resilient warrior. Anyway, back to your regular programming, :)

On the far side, Ugluk wins his fight against Boromir and the spearman ("Yay for 6s!!!"), and opted to take a shot at the spearman instead of Boromir. The result was a wound, which broke Don's force. The Uruk Captain and his force continued to maul the remaining rangers, resulting in the death of the aged retainer and Cadan's loyal spearman. One of the rangers, though, manages to kill one of the uruk shields in his fight ("Gotta love killing an enemy when you're ganged 2-1!"). Things brings my army to 2 away from breaking, which means that I broke his force just in the knick of time (*Gandalf voice* "...for which I am very grateful...").
Casualty Count: 29/41 against Isengard (2 from game), 23/42 against Osgiliath (9 from game)
Round 8 (P: Isengard)

After testing, the Uruk Captain passed (Test: 10), Ugluk passed (Test: 14), and the Feral passed (Test: 10).
One of the archers ran (1 away from the game ending), but the other stayed. For Don's force, Culang passed (Test: 15), Faramir passed (Test: 10, 2/2W) ("Cutting it kinda close there, Faramir - don't scare me like that!"), and Boromir passed (Test: 10), leaving only one Os Vet Archer and Os Vet Spearman to test (who both passed). In the Shoot Phase nothing happened, so we enter the Fight Phase.

Apologies for the blur. As you can see (after wading through the haze), we finally got the ranger in the corner, and all of the other combats resulted in nothing of importance. Boromir wins his fight against Ugluk, but fails to wound him (there goes my chance to kill his Army Leader...).

On this side, Faramir and the Os Vets ganged the Feral and took him down handily. This brought my force to 25%, and the game was over.
Final Count: 31/41 against Isengard, 24/42 against Osgiliath (8 from game)
The final Victory Points count, though, was amusing: we each received 3 points for breaking the other army, but since neither of us killed the enemy army leader or had banners remaining at the end of the game, we pulled a 3-3 Draw.
Glenstorm's Thoughts: Wow, he led off with 8 kills at range before we even closed distance. I did not expect to take 20% casualties before charging in, which will likely only be worse if I face off against an elf or dwarf force, as they hit at S3. All in all, though, I really like the force: it is very predictable, as there are only three units and four heroes, but it is an adrenaline-pulsing team, which I really like. I also just really like the models and poses of the army, so even if we never win a game, I'm looking forward to fielding this force again. My opponent played well in his position and deployment, and I had a ton of fun. Well fought, friend!
Donatello's Thoughts: The game played out more or less how I wanted it. I wish that Boromir's force could have broken the thin shield line sooner, but otherwise I cannot complain. I probably should have thrown more forces at Ugluk to attempt to kill him, but with the dice being how they were, chances are I'd have only thrown soldiers away, as he only rolled 6s to win the fight after Round 5. All in all, though, I'd look forward to fielding this force again, Glenstorm! It's definitely a keeper!
Stellar Unit for Glenstorm: Gotta be the Ferals - no question. The shields do a good job of holding ground, but having a unit with 2 attacks at S4 has become a fetish of mine, and I really enjoyed fielding these guys. I really want to play another game with this force just to field the Ferals again!
Stellar Unit for Donatello: The Osgiliath Vets were absolutely essential to the effectiveness of this list. With all of the Uruks (including heroes that did not have 2Hers) wounding on 5s - whether at range or in close combat - I was able to level the playing field in regard to wounding chance. This gave my Might-heavy heroes an edge.
So, all told, this was a really fun fight, and I look forward to having another one soon (probably this weekend). Until then, you know where to find me,
Watching the stars,
Glenstorm
"(Your teacher) is a human...and is therefore blinkered and fettered by the limitations of your kind." ~ Firenze, Harry Potter and the Order of the Phoenix
With this month being devoted to my new Uruk Tracker force, I took the opportunity on Sunday night to get together with Donatello to playtest my boys. Per an insane last week of work, it has unfortunately taken over five days to get this post up, and for that I apologize to our loyal viewership. My hope was to get it up on Monday, but life has a way of thwarting seemingly simple plans like posting on a blog, :P
But I digress. :) As we talked about which force he'd like to use, I mentioned in passing a Gondor force that I had been dabbling with, and it caught his eye. So in this battle report, I'll be using my Rager's Raiders list, and Don will be testing my new Defenders of Osgiliath list. You can find the breakdown for each team below:
Rager's Raiders (Isengard Raiders, LOME)
-Ugluk (60) (Army Leader)
-Vrasku (60)
-Uruk-Hai Scout Captain w/ 2Her (55)
-Uruk-Hai Scout Captain (50)
-6 Feral Uruk-Hai (72)
-1 Uruk-Hai Scout w/ banner (33)
-20 Uruk-Hai Scouts w/ shields (180)
-10 Uruk-Hai Scouts w/ bows (90)
TOTAL: 600 pts, 41 units, 10 Might
Defenders of Osgiliath (Rangers of Ithilien + Fellowship + Grey Company, LOME)
-Faramir w/ hvy armor/shield (80) (Army Leader)
-Damrod (20)
-8 Osgiliath Veterans w/ shields (72)
-8 Osgiliath Veterans w/ bows (72)
-8 Osgiliath Veterans w/ spears/shields (80)
-Boromir of Gondor (105)
-3 Rangers of the North (75) (Culang, Cadan, Torchirion)
-3 Rangers of Arnor w/ spears (27)
-9 Rangers of Arnor (72)
TOTAL: 603 pts, 42 units, 13 Might, 24 bows
A bit of discussion about this new list before I delve into the battle report (since this list has never been used or tested here on the TMAT blog). First of all, this list combines two of my favorite forces in the game: Osgiliath Veterans and Grey Company. Osgiliath is my favorite battle in all of Middle Earth lore bar none (which is amazing, since my favorite character is Eomer), and being able to use Os Vets in my Osgiliath Ruins scenery is something I've wanted to do for a while. I thought of using Rangers of Gondor instead of teaming in Grey Company, but as this would make my Os Vet archers obsolete (as they'd still need to fit the 33% bow limit), I opted to team in Grey Company without a power hero to attempt to stay thematically pure while still building the strongest list I can.
Second, though, the list is a highly durable one. With both Faramir and Boromir, my Os Vets have a wide radius in which they become F4 D6 warriors with Courage 4 - which is very handy for engaging terror-causing units, even if a Nazgul is present. Behind the solid line of spear-supported F4 D6, though, you also have 24 bows (25 if you choose to give Faramir one instead of giving him a shield), which is enough for two (read it again: two) volley lines. This force can carve holes in enemy formations from a distance solely because of overwhelming amounts of archery. When placed within a city where a model usually has to choose between cover from enemy archery and being able to charge next turn, this really plays to your advantage.
Finally, you have 6 heroes: Boromir (your melee tank), Faramir (who can either do ranged damage with solid melee offensive stats or be a secondary melee tank), 3 Rangers of the North (for a good spread of S4 firepower and a Might or Will point here or there), and Damrod (who is a Ranger of the North with -1 armor and -1 Courage for 5 points less). Personally, I really like the last four heroes more than the first two, which is good since people tend to target the Sons of Gondor first. :P
This is the list I'm thinking of taking to the Hunters Red October Tournament, but I'm still deciding (there's a side of me that is making a very strong argument for a straight Grey Company list, so we'll see). Needless to say, as I'm giving Donatello the defensive position in our scenario today, this will be a hard team for me to crack as I test out a new civ.
Scoring
Today we will be playing a To the Death scenario, with the following scoring rules:
- The game ends when one side is reduced to 25% of its starting force
- A team receives 3 points if they break the enemy force, and 5 points if they break the enemy force and are not broken when the game ends
- A team receives 2 points if they kill the enemy army leader (Ugluk for me, Faramir for him)
- A team receives 1 point if they have a banner surviving at the end of the game, 2 points if they are the only team to have a banner at the end of the game
Per Don's last To the Death match, he was much more optimistic of his chances to win in this battle, and had a subtle hungering for revenge ("You won't have a mounted macho hero this time to tear up my ranks, Glenstorm," :) ). I was more than happy to accommodate, as Don (along with most of the LOTR SBG gaming community, I'd contend) underestimate the power of a well-placed Ugluk on an enemy line. Our battle takes place today on the outskirts of the ruined town of Osgiliath. During a brief hiatus from their skirmishes with the forces of the Dark Lord, scouts report a horde of uruk-hai thundering toward the rear of their position. Without barricades or the river to protect them, the forces of Good rally their defenders to defend the aged city.
Glenstorm's Strategy: Donatello's archery is going to pummel me as I approach. With almost 25 bows, he's expected to do about 2 casualties a round from range, which means I'll likely be short 4-6 guys before entering melee combat. Since he also has superior numbers (by 7 worst case scenario with the stats above factored in), I'm going to attempt a 1-2 punch using melee and archery. My archers will primarily screen the rest of the army, attracting volley fire and straight shots once within range, with Vrasku doing a few kills at range before closing in for melee combat. My shields will screen the captains, who I will attempt to use to kill rangers, as they wound on 4s (or 3s for the 2H). Ugluk will hold down Boromir and force him to burn through Might quickly. To win the match, I'll break his army, not lose my banner, not lose Ugluk, and quickly fall to 25% to end the match.
Donatello's Strategy: Glenstorm's shields and captains are all D5, which means wounding them with archery will be hard. Most of my army will be F4, though, so the Uruk advantage of high FV will be lost so long as I keep Boromir and Faramir alive. That means I'm going to attempt to keep both of them out of combat with his heroes as much as possible, as those Might points could cause additional losses on my forces due to a loss of FV. The goal will be to draw his elements toward my more defensive positions, keep him from wrapping around my men, and use spear support to force him to shield. Killing the ferals will take priority, followed by the banner for Victory Points. So, to call the ball: Boromir and Faramir will break the two flanks, the rangers will provide supporting fire on the wings in a Flying Column formation, and I'll shelter the center with suppressing fire to keep his elements from reinforcing each other.
The board was set, our forces were placed, and as we prepared for Round 1, the board looked like this:

And with that... ("For death and glory!")
Round 1 (P: Osgiliath)
The armies advanced toward each other, with the rangers at the top of board opting to move 3" to form a volley line. As you'll notice, Don has his Os Vet archers split up between Boromir and Faramir's detachments, so he is only sporting one volley line (that is also attempting to hold against my right flankers). I opted to move my uruk archers 6" this round, as my chances of scoring a kill were very low, and I was more interested in getting into the city than sitting outside like deer in a glen.

In the Shoot Phase, Torchirion killed one of my archers and one of the rangers of arnor took down one of my uruk shields with their volley line. With no melee attacks in the Fight Phase, we move to Round 2.
Round 2 (P: Osgiliath)
Forgot to take a board shot - my fault. Don moved up his force, taking entrenched positions behind barriers and walls as his archers moved up to the higher sections of the ruins. My force approached the city, and began the long process of entering the maze of walls that was the edge of town. Vrasku opted to stand his ground and load this turn.

In the Shoot Phase, Culang and one of the Rangers of Arnor took out two of my uruk archers before they could fire.

On the far side, one of the Rangers of Arnor took down one of my uruk shields.

In response, Vrasku shared the love that was going around and took down an Os Vet and Os Vet with spear from Faramir's detachment (1/3M). With my force moving through the firing lane that Vrasku is currently using, though, I will likely need to move him next turn to get him in a better firing position. With no melee fights, we move to Round 3, where I finally manage to get priority!
Round 3 (P: Isengard)

The armies are now firmly within the city, and the men of Gondor are eyeing close combat (which looks like it will be met in Round 4). The Osgiliath Veteran archers have primarily taken higher positions, and the brave company of rangers on the far left are now being supported by Boromir and his force on the other side of the wall. Ugluk and his detachment head toward the mighty son of Gondor, while the captains take their forces around the wings.
Glenstorm's strategy: My plan over the next few turns is to move Vrasku toward the center of the map, so that I can use him to fire down the spear support lines. This will either draw soldiers away from their intended detachments, or it will negate the spear support advantage that Don has on me. Optimally, a number of the rangers will be in the crosshairs, as I wound them on 4s instead of 5s.

Pardon the blur. In the Shoot Phase, my archers killed no one (my token dice wiff round), and Don responds with yet more wounds from archery. Cadan killed one of the uruk shields (1/1M), and then...

...One of Culang's rangers killed another uruk shield, and the Osgiliath Veteran archer with the head bandange also managed to kill my archer that made it to the perch on the city wall, bringing the casualty count so far to...
Casualties: 8/41 against the Uruks, 2/42 against Osgiliath ("This...isn't going very well...")
Round 4 (P: Isengard)

MELEE TIME!!! After three agonizing rounds of casualties, my force is finally in its element: the inevitable mauling and goring of close-combat melee rounds. Ugluk and his force (with banner support) are locked against Boromir's force of F4 Os Vets, and the captains have engaged the front lines on the wings. As Vrasku stops to load, most of the uruk archers opt to move 6" in order to bring them into melee combat next round.

In the Shoot Phase, Vrasku takes down both of the archers in his firing lane (2/3M), but both of my uruk archers on the right failed to hit the Os Vet archers up top. In response, Donatello's already deadly archery take the casualties to the next level. Damrod took a well-aimed shot at the Feral Uruk-Hai coming around the far right side ("Man, I wanted that!"), and the Os Vet archer with the head bandage took down one of my uruk archers ("Dude, this guy's a BOSS!"). On the other side of the board, just to add insult to injury...

The Ranger of Arnor at the top of the steps (far right of the pic) took down another of my Feral Uruk-Hai, paying for himself and then some in one round of archery. (*Blink blink* "...Words fail me...") And on that note, as the lines crashed together, a slew of Heroic Combats were called as we entered the Fight Phase.
In the Fight Phase, there were 4 Heroic Combats called, resolved in the following order: Boromir (1/6M), Ugluk (1/3M), Culang (1/1M), and Faramir (1/3M).


In Culang's combat, he, Dannassel, and the other ranger killed the trapped uruk, and they split forces to support his men. He and Dannassel tagged the uruk shield in the Feral Uruk-hai's fight, while the other ranger assisted in the fight with the Uruk Scout 2H Captain. Faramir lost his Heroic Combat (I could have won it if I spent my remaining 2 Might points, but I decided not to. In hindsight, this was a very good call) to the shielding uruk, which ended all of the Heroic Combats for this turn.

Sorry again for the blur. In the rest of the Fight Phase, the Os Vet with spear support to the right of Ugluk killed the Feral Uruk-Hai they were up against, which set back my plans a lot. Boromir won his fight, but failed to wound the uruk shield (I could have wounded him if I spent 2 more Might, but I again opted not to. I'm also glad in hindsight that I did that). Ugluk killed his man handily, and the other Feral won his fight but failed to wound the Os Vet.

On the far left side of the battle, nothing goes right for the rangers. An uruk shield kills one of the Rangers of Arnor, the Uruk Scout Captain kills one of his rangers (2/2M), and the Feral Uruk-Hai wounds Torchirion once who fails to save the wound with Fate (1/1F), and is unable to promote the Fate roll with his Might to a winning number ("That bites.") ("Yeah; I'm sorry, man..."). The uruks now outnumber the rangers on this side, which from my experience as a Grey Company player does not bode well for their survivability.

On the right side of the field, things are looking much better for Don. One of the Os Vets kills one of my uruk shields, while the Uruk 2H Captain goes to town on the rangers in his combat, wounding one of the rangers and barely missing the other. Don still has me majorly oustripped on numbers on this side of the board, though, which will cause problems for my force.
Casualty Count: 15/41 against Isengard (6 from break), 10/42 against Osgiliath (11 to break)
Round 5 (P: Osgiliath)

As we enter Round 5, the armies are now completely engulfed in melee combat. I called a Heroic Move with my Uruk 2H Captain, as I wanted to reform the lines a bit, as we were very scattered at the end of the last turn. Don didn't challenge it (My heroes and warriors were in well-entrenched positions, so I wasn't very worried about my position afterwards. I'm also hoping to save Faramir's Might for later this round), so the movements ended like this. After Don engaged my archer at the top of the board, I opted to move Vrasku into melee mode, taking advantage of his F5 S5 in close combat. My uruks swarm his rangers on the far left - I'm really looking forward to seeing how he's going to call those combats, :) With no shots available in the Shoot Phase, we move directly into combats.
Four Heroic Combats are called, and were resolved in this order: Boromir (4/6M), Ugluk (2/3M), Faramir (2/3M), and Vrasku (3/3M). Boromir succeeds in killing his man (5/6M) ("AAAARRRRGGGGHHHH!!! These SHIELDS!!!"), and engages the banner (which is potentially a problem for me, as it is an easy 2 points for me if my banner survives, and is my primary means of attempting to win this game at this point). Ugluk and the shield involved in his combat kill their man, and they both engage Boromir, hoping to protect my banner, and take advantage of the fact that he is down to only 1 Might point.

On the other side, Faramir kills the uruk shield in his fight (3/3M) ("Man, the shields are killing my Might store today!"), and then engages the uruk archer in the Feral Uruk-Hai's combat, evening the odds in the Os Vet fight.

Vrasku and the archer kill their man, and they split forces. The archer moves to reinforce Ugluk and his troop, while Vrasku attempts to join up with the Uruk 2H Cap on Faramir's side of the board.

Don opted to start with the fights on the left first, and he met with great success. The Feral took down one of the Os Vet Swordsmen and one of the rangers fell to my 2Her Captain, but all of the other fights went his way. Faramir and Damrod killed their men, Captain Terrek and his spear support felled another warrior, and the ranger at the top of the screen somehow fended off yet another wave of aggression from the two uruk archers at the top of the screen. Culang and Dannassel lost to the shielding uruk in their combat, but Don is still managing to outscore me in kills on this side of the board. He also has me 1 model away from breaking, which is not good considering that Boromir has yet to go...

...And he gets that kill. Ugluk passed the Horn of Gondor courage test (Test: 11), but we failed to win the fight, and he managed to kill both the banner and the shield (6/6M), which breaks my army and costs me my banner. The other units in this area all did a bunch of nothing: I think the highest number any of us rolled was a 2 in those fights. It was...pretty pathetic, which is not good since I'm still pretty far from breaking him, which I need to do very soon.

On the far left, the dramatically overwhelmed rangers managed to hold on valiantly, with only two rangers falling in close combat. My plan at this point is to overwhelm the aged retainer, Cadan, and the spearman, and start rushing warriors through the door to assist with the Boromir problem.
Casualty Count: 22/41 against Isengard (9 from game), 16/42 against Osgiliath (5 to break)
Round 6 (P: Isengard)

Before discussing this round, I wanted you to know that there was a lot of nothing this round; the dice hated both of us, so there was not nearly as much carnage as there could have been (which I was okay with for this round). I started out by courage testing for my army, and with all of my heroes passing (Uruk Cap: 14, Ugluk: 11, Vrasku: 13, Uruk 2H Cap: 12), and one uruk archer passing (Test: 10), everyone stuck around to continue the assault. Don started moving a number of his archers off of the perches and brought them into melee range. With no shots available, we moved into combats.

On the far left side, I was counting on five kills (which would break his army), and only managed to kill Cadan. One of the Os Vet Spearmen managed to kill one of my archers, and the rest of the fights in the area were wiffed on both sides. The Feral passed Boromir's Horn of Gondor test (Test: 11 - yay for C5 units!), and after winning the fight, Boromir wounded Ugluk once, who wiffed his Fate roll (1/2H).

On the left side, Captain Terrek manages to kill one of the Uruk shields, Vrasku kills one of the Os Vets, and the uruk archer with the helmet manages to kill Damrod (who wiffed his Fate roll; I'm still a bit ticked about that) instead of aiming at Dannassel. At the end of the round, the casualty count is coming down to the wire:
Casualty Count: 24/41 against Isengard (7 from game), 19/42 against Osgiliath (2 from break)
Round 7 (P: Osgiliath)

Don began his move by tagging all of my captains, which prevented me from calling "Stand Fast!" on successful courage tests this round for my captains. I ended up testing for 5 units, and two of them ran (which you can see exiting on the far left side of the pic). From this angle it's impossible to see, but Vrasku has been trapped and swarmed by Os Vet archers, and my men are pretty much ganged all across the board except on the far left. Things are looking desperate for me as I'm 7 casualties from the end of the game and have still not managed to break his force. With no shots available, we move to fights with no Might points left on the board.

Faramir manages to kill the Uruk 2Her, and the Os Vet archers land 2 wounds on Vrasku, who fails his Fate roll (1/1F, 2/2H). The Feral wins his fight against Culang and Dannassel, though, and wounds Dannassel.
And here it is worth taking a moment to pause for a moment for the gravity of the situation - and by this I do not mean that Don is 1 unit away from breaking. I am referring instead to two solemn facts that have both come to a head in this fight. First, this is the first time Dannassel has been a casualty in combat, which on its own deserves a moment of silence. What is more, this is also the last time I will be fielding Dannassel, Ranger of Arnor, in my army, and thus her first death is also in her last game, which is worth pausing over.
...LET ME EXPLAIN!!! :) The reason that this is the last combat for Dannassel, Ranger of Arnor, is not that I am not fielding the model in combat anymore. After all, after all of the time I spent on the conversion, I could never bring myself to not field the model in a fight. Instead, I wanted to take this moment to announce that Dannassel will be undergoing yet another conversion: in the next battle report you read involving her, you will be introduced to her as Dannassel, Ranger of the North! Of all of my Rangers of Arnor, she has well earned a place among the greatest of her kin, and I look forward to changing the paint scheme to accommodate her as a stronger, more resilient warrior. Anyway, back to your regular programming, :)

On the far side, Ugluk wins his fight against Boromir and the spearman ("Yay for 6s!!!"), and opted to take a shot at the spearman instead of Boromir. The result was a wound, which broke Don's force. The Uruk Captain and his force continued to maul the remaining rangers, resulting in the death of the aged retainer and Cadan's loyal spearman. One of the rangers, though, manages to kill one of the uruk shields in his fight ("Gotta love killing an enemy when you're ganged 2-1!"). Things brings my army to 2 away from breaking, which means that I broke his force just in the knick of time (*Gandalf voice* "...for which I am very grateful...").
Casualty Count: 29/41 against Isengard (2 from game), 23/42 against Osgiliath (9 from game)
Round 8 (P: Isengard)

One of the archers ran (1 away from the game ending), but the other stayed. For Don's force, Culang passed (Test: 15), Faramir passed (Test: 10, 2/2W) ("Cutting it kinda close there, Faramir - don't scare me like that!"), and Boromir passed (Test: 10), leaving only one Os Vet Archer and Os Vet Spearman to test (who both passed). In the Shoot Phase nothing happened, so we enter the Fight Phase.

Apologies for the blur. As you can see (after wading through the haze), we finally got the ranger in the corner, and all of the other combats resulted in nothing of importance. Boromir wins his fight against Ugluk, but fails to wound him (there goes my chance to kill his Army Leader...).

On this side, Faramir and the Os Vets ganged the Feral and took him down handily. This brought my force to 25%, and the game was over.
Final Count: 31/41 against Isengard, 24/42 against Osgiliath (8 from game)
The final Victory Points count, though, was amusing: we each received 3 points for breaking the other army, but since neither of us killed the enemy army leader or had banners remaining at the end of the game, we pulled a 3-3 Draw.
Conclusion
Glenstorm's Thoughts: Wow, he led off with 8 kills at range before we even closed distance. I did not expect to take 20% casualties before charging in, which will likely only be worse if I face off against an elf or dwarf force, as they hit at S3. All in all, though, I really like the force: it is very predictable, as there are only three units and four heroes, but it is an adrenaline-pulsing team, which I really like. I also just really like the models and poses of the army, so even if we never win a game, I'm looking forward to fielding this force again. My opponent played well in his position and deployment, and I had a ton of fun. Well fought, friend!
Donatello's Thoughts: The game played out more or less how I wanted it. I wish that Boromir's force could have broken the thin shield line sooner, but otherwise I cannot complain. I probably should have thrown more forces at Ugluk to attempt to kill him, but with the dice being how they were, chances are I'd have only thrown soldiers away, as he only rolled 6s to win the fight after Round 5. All in all, though, I'd look forward to fielding this force again, Glenstorm! It's definitely a keeper!
Stellar Unit for Glenstorm: Gotta be the Ferals - no question. The shields do a good job of holding ground, but having a unit with 2 attacks at S4 has become a fetish of mine, and I really enjoyed fielding these guys. I really want to play another game with this force just to field the Ferals again!
Stellar Unit for Donatello: The Osgiliath Vets were absolutely essential to the effectiveness of this list. With all of the Uruks (including heroes that did not have 2Hers) wounding on 5s - whether at range or in close combat - I was able to level the playing field in regard to wounding chance. This gave my Might-heavy heroes an edge.
So, all told, this was a really fun fight, and I look forward to having another one soon (probably this weekend). Until then, you know where to find me,
Watching the stars,
Glenstorm
"(Your teacher) is a human...and is therefore blinkered and fettered by the limitations of your kind." ~ Firenze, Harry Potter and the Order of the Phoenix
Good question. Right now I'm caught in the classic bind of hobbyers, as I have Easterlings, Hobbits, Dwarves, Elves, Dol Amroth Knights, Minotaurs, and Space Wolves all clamoring for painting, in addition to a few scenery pieces I'm working on.
ReplyDeleteThe uruks are basically all painted - a lot of Abbadon Black with Rhinox Hide for the skin tone and Tin Bitz for the weapons. I'll probably finish up the Gondor soldiers next month when I concentrate on them.
good game both. Centaur got off lucky with Boromir being stunted to 5 kills/wounds. When I saw the lists I was expecting the sons of Denathor to cut a swathe through the Uruks. They are a very formidable pair.
ReplyDeleteI'm really liking the look of that Osgiliath list (as long as it is pointed at someone else that is): slightly higher than average numbers, decent quantities of F4-capable troops, a hail of bowfire and tons of might.
one symantical note though - it actually is a Tower of Ecthelion/RoI/GC/Fellowship list. The "Rangers of Ithilien" version of Farimir doesn't have HA or shield. Just one of the kinks of integrating the LOME system.
sounds like we need to set up a couple painting nights next week while the Mrs is out of town. We both have a pretty hefty backlog to get through.
I'm game - almost all of my Easterling force is painted (just the 10 pikes left to go), but I've got easily 30-40 models that need painting. We should definitely get them painted, :) Would you be open to a game against the Raiders that evening as well?
DeleteI'm sure we can work out something. I have all of this weekend, all next week and most of next weekend to fill.
DeleteGreat battle report that had me reading like a good novel. Makes me want to get my Rohirrim and my Osengard armies out for another battle.
ReplyDelete